<?xml version="1.0" encoding="utf-8"?>
<feed xmlns="http://www.w3.org/2005/Atom">
  <title>0xCLOVER</title>
  
  
  <link href="/./atom.xml" rel="self"/>
  
  <link href="https://0xclover.com/"/>
  <updated>2024-11-05T15:30:28.714Z</updated>
  <id>https://0xclover.com/</id>
  
  <author>
    <name>hexclover</name>
    
  </author>
  
  <generator uri="http://hexo.io/">Hexo</generator>
  
  <entry>
    <title>论我是如何被 GCC OpenSSL 链接参数的顺序硬控了一晚上</title>
    <link href="https://0xclover.com/2024/11/ld-link-as-needed-and-argument-order/"/>
    <id>https://0xclover.com/2024/11/ld-link-as-needed-and-argument-order/</id>
    <published>2024-11-05T22:32:47.000Z</published>
    <updated>2024-11-05T15:30:28.714Z</updated>
    
    <content type="html"><![CDATA[<h2 id="起">起</h2><p>在 Ubuntu 22.04 上编译以下使用 OpenSSL 库的程序时，发生了 <code>undefined reference to `OPENSSL_init_crypto'</code> 这一链接错误：</p><figure class="highlight c"><table><tr><td class="gutter"><pre><span class="line">1</span><br><span class="line">2</span><br><span class="line">3</span><br><span class="line">4</span><br><span class="line">5</span><br></pre></td><td class="code"><pre><span class="line"><span class="meta">#<span class="keyword">include</span> <span class="string">&lt;openssl/evp.h&gt;</span></span></span><br><span class="line"></span><br><span class="line"><span class="type">int</span> <span class="title function_">main</span><span class="params">()</span> &#123;</span><br><span class="line">    OPENSSL_add_all_algorithms_noconf();</span><br><span class="line">&#125;</span><br></pre></td></tr></table></figure><figure class="highlight console"><table><tr><td class="gutter"><pre><span class="line">1</span><br><span class="line">2</span><br><span class="line">3</span><br><span class="line">4</span><br></pre></td><td class="code"><pre><span class="line"><span class="meta prompt_">$ </span><span class="language-bash">gcc -lssl -lcrypto foo.c</span></span><br><span class="line">/usr/bin/ld: /tmp/ccHvEUdz.o: in function `main&#x27;:</span><br><span class="line">foo.c:(.text+0x13): undefined reference to `OPENSSL_init_crypto&#x27;</span><br><span class="line">collect2: error: ld returned 1 exit status</span><br></pre></td></tr></table></figure><p>与此同时，我在一个干净的 NixOS 系统中尝试了编译同一个文件，是能成功的：</p><figure class="highlight nix"><table><tr><td class="gutter"><pre><span class="line">1</span><br><span class="line">2</span><br><span class="line">3</span><br><span class="line">4</span><br><span class="line">5</span><br><span class="line">6</span><br><span class="line">7</span><br><span class="line">8</span><br><span class="line">9</span><br><span class="line">10</span><br><span class="line">11</span><br><span class="line">12</span><br><span class="line">13</span><br><span class="line">14</span><br><span class="line">15</span><br><span class="line">16</span><br><span class="line">17</span><br><span class="line">18</span><br><span class="line">19</span><br><span class="line">20</span><br><span class="line">21</span><br><span class="line">22</span><br><span class="line">23</span><br><span class="line">24</span><br><span class="line">25</span><br><span class="line">26</span><br></pre></td><td class="code"><pre><span class="line">&#123;</span><br><span class="line">  <span class="attr">description</span> = <span class="string">&quot;A very basic flake&quot;</span>;</span><br><span class="line"></span><br><span class="line">  <span class="attr">inputs</span> = &#123;</span><br><span class="line">    nixpkgs.<span class="attr">url</span> = <span class="string">&quot;github:nixos/nixpkgs?ref=nixos-unstable&quot;</span>;</span><br><span class="line">  &#125;;</span><br><span class="line"></span><br><span class="line">  <span class="attr">outputs</span> =</span><br><span class="line">    &#123; self, nixpkgs &#125;:</span><br><span class="line">    <span class="keyword">let</span></span><br><span class="line">      <span class="attr">system</span> = <span class="string">&quot;x86_64-linux&quot;</span>;</span><br><span class="line">      <span class="attr">pkgs</span> = <span class="built_in">import</span> nixpkgs &#123; <span class="keyword">inherit</span> system; &#125;;</span><br><span class="line">    <span class="keyword">in</span></span><br><span class="line">    &#123;</span><br><span class="line">      devShells.$&#123;system&#125;.<span class="attr">default</span> = pkgs.mkShell &#123;</span><br><span class="line">        <span class="attr">buildInputs</span> = <span class="keyword">with</span> pkgs; [</span><br><span class="line">            openssl</span><br><span class="line">        ];</span><br><span class="line"></span><br><span class="line">        <span class="attr">nativeBuildInputs</span> = <span class="keyword">with</span> pkgs; [</span><br><span class="line">            gcc11</span><br><span class="line">            pkg-config</span><br><span class="line">        ];</span><br><span class="line">      &#125;;</span><br><span class="line">    &#125;;</span><br><span class="line">&#125;</span><br></pre></td></tr></table></figure><figure class="highlight console"><table><tr><td class="gutter"><pre><span class="line">1</span><br><span class="line">2</span><br><span class="line">3</span><br><span class="line">4</span><br></pre></td><td class="code"><pre><span class="line"><span class="meta prompt_">NixOS$ </span><span class="language-bash">pkg-config --cflags --libs openssl</span></span><br><span class="line">-I/nix/store/xm6d1ig9ff7zkid1gvzsbig45m2pnlaz-openssl-3.3.2-dev/include -L/nix/store/m8gwqmn8k3jm0gbcia358mz4y00lgmbc-openssl-3.3.2/lib -lssl -lcrypto</span><br><span class="line"><span class="meta prompt_">NixOS$ </span><span class="language-bash">gcc $(pkg-config --libs openssl) foo.c</span></span><br><span class="line"><span class="meta prompt_">NixOS$ </span><span class="language-bash">./a.out</span></span><br></pre></td></tr></table></figure><h2 id="承">承</h2><p>为了排查问题，首先确认相关库的版本是否正确。注意在 Ubuntu 22.04 上，OpenSSL 的打包粒度很细，我把相关的包都重装了一遍（实际上还做了一堆别的检查，从略）：</p><figure class="highlight console"><table><tr><td class="gutter"><pre><span class="line">1</span><br></pre></td><td class="code"><pre><span class="line"><span class="meta prompt_"># </span><span class="language-bash">apt reinstall openssl libssl3 libssl-dev</span></span><br></pre></td></tr></table></figure><p>接下来确认使用的 linking flags 是否正确：</p><figure class="highlight console"><table><tr><td class="gutter"><pre><span class="line">1</span><br><span class="line">2</span><br></pre></td><td class="code"><pre><span class="line"><span class="meta prompt_">$ </span><span class="language-bash">pkg-config --cflags --libs openssl</span></span><br><span class="line">-lssl -lcrypto</span><br></pre></td></tr></table></figure><p>可见我使用的编译参数与 <code>pkg-config</code> 推荐的一样。接下来我们查看 GCC 实际使用的 <code>.so</code> 文件是什么：</p><figure class="highlight console"><table><tr><td class="gutter"><pre><span class="line">1</span><br><span class="line">2</span><br><span class="line">3</span><br><span class="line">4</span><br><span class="line">5</span><br><span class="line">6</span><br><span class="line">7</span><br><span class="line">8</span><br><span class="line">9</span><br><span class="line">10</span><br><span class="line">11</span><br><span class="line">12</span><br><span class="line">13</span><br><span class="line">14</span><br><span class="line">15</span><br><span class="line">16</span><br><span class="line">17</span><br></pre></td><td class="code"><pre><span class="line"><span class="meta prompt_">$ </span><span class="language-bash">gcc --verbose -Wl,--verbose foo.c</span></span><br><span class="line">(...略...)</span><br><span class="line">/usr/bin/ld: mode elf_x86_64</span><br><span class="line">(...略...)</span><br><span class="line">attempt to open /usr/lib/gcc/x86_64-linux-gnu/11/libssl.so failed</span><br><span class="line">attempt to open /usr/lib/gcc/x86_64-linux-gnu/11/libssl.a failed</span><br><span class="line">attempt to open /usr/lib/gcc/x86_64-linux-gnu/11/../../../x86_64-linux-gnu/libssl.so succeeded</span><br><span class="line">/usr/lib/gcc/x86_64-linux-gnu/11/../../../x86_64-linux-gnu/libssl.so</span><br><span class="line">attempt to open /usr/lib/gcc/x86_64-linux-gnu/11/libcrypto.so failed</span><br><span class="line">attempt to open /usr/lib/gcc/x86_64-linux-gnu/11/libcrypto.a failed</span><br><span class="line">attempt to open /usr/lib/gcc/x86_64-linux-gnu/11/../../../x86_64-linux-gnu/libcrypto.so succeeded</span><br><span class="line">/usr/lib/gcc/x86_64-linux-gnu/11/../../../x86_64-linux-gnu/libcrypto.so</span><br><span class="line">(...略...)</span><br><span class="line">/usr/bin/ld: /tmp/ccJpwMbq.o: in function `main&#x27;:</span><br><span class="line">foo.c:(.text+0x13): undefined reference to `OPENSSL_init_crypto&#x27;</span><br><span class="line">/usr/bin/ld: link errors found, deleting executable `a.out&#x27;</span><br><span class="line">collect2: error: ld returned 1 exit status</span><br></pre></td></tr></table></figure><p>可见 <code>ld</code> 实际使用的是 <code>/usr/lib/x86_64-linux-gnu/lib&#123;ssl,crypto&#125;.so</code> 两个文件。我们使用 <code>nm -D</code> 命令查看相关符号是否存在：</p><figure class="highlight console"><table><tr><td class="gutter"><pre><span class="line">1</span><br><span class="line">2</span><br><span class="line">3</span><br><span class="line">4</span><br></pre></td><td class="code"><pre><span class="line"><span class="meta prompt_">$ </span><span class="language-bash">nm -D /usr/lib/x86_64-linux-gnu/libssl.so | rg OPENSSL_init_crypto</span></span><br><span class="line">                 U OPENSSL_init_crypto@OPENSSL_3.0.0</span><br><span class="line"><span class="meta prompt_">$ </span><span class="language-bash">nm -D /usr/lib/x86_64-linux-gnu/libcrypto.so | rg OPENSSL_init_crypto</span></span><br><span class="line">00000000001bf600 T OPENSSL_init_crypto@@OPENSSL_3.0.0</span><br></pre></td></tr></table></figure><p>根据 <code>nm(1p)</code>：</p><figure class="highlight plaintext"><table><tr><td class="gutter"><pre><span class="line">1</span><br><span class="line">2</span><br><span class="line">3</span><br><span class="line">4</span><br></pre></td><td class="code"><pre><span class="line">&quot;T&quot;</span><br><span class="line">&quot;t&quot; The symbol is in the text (code) section.</span><br><span class="line"></span><br><span class="line">&quot;U&quot; The symbol is undefined.</span><br></pre></td></tr></table></figure><p>可见 <code>libcrypto.so</code> 中确实定义了 <code>OPENSSL_init_crypto</code> 这一符号。这可奇了，为什么 <code>ld</code> 就是找不到它呢？</p><h2 id="转">转</h2><p>经过痛苦而无益的尝试，小编突然发现，只要把链接参数和源文件的顺序调转一下，就能在 Ubuntu 上成功编译了：</p><figure class="highlight console"><table><tr><td class="gutter"><pre><span class="line">1</span><br><span class="line">2</span><br><span class="line">3</span><br><span class="line">4</span><br><span class="line">5</span><br><span class="line">6</span><br></pre></td><td class="code"><pre><span class="line"><span class="meta prompt_">$ </span><span class="language-bash">gcc -lssl -lcrypto foo.c</span></span><br><span class="line">/usr/bin/ld: /tmp/ccIqp0ls.o: in function `main&#x27;:</span><br><span class="line">foo.c:(.text+0x13): undefined reference to `OPENSSL_init_crypto&#x27;</span><br><span class="line">collect2: error: ld returned 1 exit status</span><br><span class="line"><span class="meta prompt_">$ </span><span class="language-bash">gcc foo.c -lssl -lcrypto</span></span><br><span class="line"><span class="meta prompt_">$ </span><span class="language-bash">./a.out</span></span><br></pre></td></tr></table></figure><p>相对地，在 NixOS 上，参数的顺序并无影响：</p><figure class="highlight console"><table><tr><td class="gutter"><pre><span class="line">1</span><br><span class="line">2</span><br></pre></td><td class="code"><pre><span class="line"><span class="meta prompt_">NixOS$ </span><span class="language-bash">gcc $(pkg-config --libs openssl) foo.c</span></span><br><span class="line"><span class="meta prompt_">NixOS$ </span><span class="language-bash">gcc foo.c $(pkg-config --libs openssl)</span></span><br></pre></td></tr></table></figure><h2 id="结">结</h2><p>其实这一切背后的原因与 <code>--&#123;,no-&#125;as-needed</code> 这一组链接参数有关。具体的细节在 <a href="https://stackoverflow.com/a/409470">Why does the order in which libraries are linked sometimes cause errors in GCC? - Stack Overflow</a> 这个 Stack Overflow 回答里科普得很清楚，就不多介绍啦。</p><p>需要注意的是，这两个参数的影响除了编译成功与否之外，还反映在最终的可执行文件上：如果实际上没有引用库的内容，则 <code>--as-needed</code> 实际上<strong>不会</strong>将可执行文件链接过去（可以使用 <code>ldd</code> 确认）。</p><p>由此可见，虽然 <code>pkg-config</code> 确实能给出（推荐的）编译参数，但怎样把这些编译参数正确地整合到编译命令里（对于没有经验的人来说）还是一件大麻烦。所以，有没有相关的编译命令自动生成 / 验证 / 修复工具（的需求）？</p><p>救救孩子……</p>]]></content>
    
    <summary type="html">


          &lt;h2 id=&quot;起&quot;&gt;起&lt;/h2&gt;
&lt;p&gt;在 Ubuntu 22.04 上编译以下使用 OpenSSL


    </summary>
    
      <category term="工作" scheme="https://0xclover.com/categories/%E5%B7%A5%E4%BD%9C/"/>
    
    
      <category term="Linux" scheme="https://0xclover.com/tags/Linux/"/>
    
      <category term="C" scheme="https://0xclover.com/tags/C/"/>
    
      <category term="C++" scheme="https://0xclover.com/tags/C/"/>
    
      <category term="Linking" scheme="https://0xclover.com/tags/Linking/"/>
    
  </entry>
  
  <entry>
    <title>在国际版 MIUI 14 中使用小米钱包和交通卡</title>
    <link href="https://0xclover.com/2023/05/miui-wallet-in-global-roms/"/>
    <id>https://0xclover.com/2023/05/miui-wallet-in-global-roms/</id>
    <published>2023-05-09T00:30:40.000Z</published>
    <updated>2024-11-05T15:30:28.714Z</updated>
    
    <content type="html"><![CDATA[<h2 id="背景-Background">背景 / Background</h2><ul><li>设备：Redmi Note 12 Turbo</li><li>系统：MIUI Global 14.0.7，欧洲版（EEA，非 <a href="http://xiaomi.eu">xiaomi.eu</a>）</li></ul><h2 id="目标-The-Challenge">目标 / The Challenge</h2><p>在上述环境下用上<a href="https://www.mi.com/service/consult/mipay-Smart%20Card">公交卡</a>。</p><h2 id="步骤-Our-Approach">步骤 / Our Approach</h2><ol><li>安装 Magisk，获取 root 权限；</li><li>下载并安装 <a href="https://www.apkmirror.com/apk/xiaomi-inc/mi-wallet/">Xiaomi Wallet / com.mipay.wallet</a> 和 <a href="https://www.apkmirror.com/apk/xiaomi-inc/mismartcards/">Mi Smart Cards / com.miui.tsmclient</a>；</li><li>在 <code>/data/adb/service.d</code> 下创建一个脚本文件 <code>set_se.sh</code>，并赋予可执行权限。下面的命令可通过电脑端 <code>adb shell</code> 或手机端 <a href="https://f-droid.org/zh_Hans/packages/com.termux/">Termux</a> 执行：<figure class="highlight console"><table><tr><td class="gutter"><pre><span class="line">1</span><br><span class="line">2</span><br><span class="line">3</span><br><span class="line">4</span><br><span class="line">5</span><br><span class="line">6</span><br><span class="line">7</span><br><span class="line">8</span><br><span class="line">9</span><br></pre></td><td class="code"><pre><span class="line"><span class="meta prompt_">$ </span><span class="language-bash">su</span></span><br><span class="line"><span class="meta prompt_"># </span><span class="language-bash"><span class="built_in">cd</span> /data/adb/service.d</span></span><br><span class="line"><span class="meta prompt_"># </span><span class="language-bash"><span class="built_in">echo</span> <span class="string">&#x27;resetprop ro.vendor.se.type HCE,UICC,eSE&#x27;</span> &gt; set_se.sh</span></span><br><span class="line"><span class="meta prompt_"># </span><span class="language-bash"><span class="built_in">chmod</span> +x set_se.sh</span></span><br><span class="line"><span class="meta prompt_"># </span><span class="language-bash"><span class="built_in">ls</span> -l</span></span><br><span class="line">total 4</span><br><span class="line">-rwxr-xr-x 1 root root 41 2023-05-09 00:43 set_se.sh</span><br><span class="line"><span class="meta prompt_"># </span><span class="language-bash"><span class="built_in">cat</span> set_se.sh</span></span><br><span class="line">resetprop ro.vendor.se.type HCE,UICC,eSE</span><br></pre></td></tr></table></figure></li><li>重启，启动小米钱包的公交卡功能，按照提示打开 NFC 设置，将<code>默认付款应用</code>设为<code>内置安全模块</code>。</li></ol><h3 id="每步都干了啥？">每步都干了啥？</h3><ul><li><strong>安装 Xiaomi Wallet</strong>——就是小米钱包啦。</li><li><strong>安装 Mi Smart Cards</strong>——为了让钱包的界面顶部出现交通卡那一栏图标。</li><li><strong>创建 <code>set_se.sh</code></strong>——这是一个 <a href="https://github.com/topjohnwu/Magisk/blob/master/docs/guides.md#boot-scripts">Magisk 启动脚本</a>，通过修改<a href="https://source.android.com/docs/core/architecture/configuration/add-system-properties">系统属性</a>让<code>默认付款应用</code>中出现我们需要的选项。</li></ul><h2 id="相关工作-Related-Work">相关工作 / Related Work</h2><ul><li><a href="https://blog.minamigo.moe/archives/184">MIUI EU 欧洲版 本地化 Magisk 模块 – Koizumi’s Blog</a>——非 EU 版的我强上后喜提 bootloop……</li><li><a href="https://zhuanlan.zhihu.com/p/264800660">MIUI 国际版/EU 安装小米钱包 傻瓜教程 - 知乎</a>——有点复杂。</li><li><a href="https://www.mobile01.com/topicdetail.php?f=634&amp;t=6666589">小米錢包在歐版本安裝教學(免root 免magisk)~小米12 s Ultra試過OK~ - Mobile01</a>——装上这两个 App 之后能打开钱包，但无法将其设为默认付款应用（没有所谓的<code>內建安全模組</code>）。</li><li><a href="https://www.v2ex.com/t/394591?p=2">MIUI 9 欧洲版移植小米公交、支付等服务 - V2EX</a>——是这个楼让我知道要更改 <code>build.prop</code>，但热更改似乎不起作用。尝试用启动脚本修改，于是就解决了。</li></ul>]]></content>
    
    <summary type="html">


          &lt;h2 id=&quot;背景-Background&quot;&gt;背景 /


    </summary>
    
      <category term="日常" scheme="https://0xclover.com/categories/%E6%97%A5%E5%B8%B8/"/>
    
    
      <category term="Android" scheme="https://0xclover.com/tags/Android/"/>
    
      <category term="MIUI" scheme="https://0xclover.com/tags/MIUI/"/>
    
  </entry>
  
  <entry>
    <title>让Firefox自动隐藏地址栏和书签栏</title>
    <link href="https://0xclover.com/2021/09/firefox-autohiding-toolbars/"/>
    <id>https://0xclover.com/2021/09/firefox-autohiding-toolbars/</id>
    <published>2021-09-12T13:05:12.000Z</published>
    <updated>2024-11-05T15:30:28.714Z</updated>
    
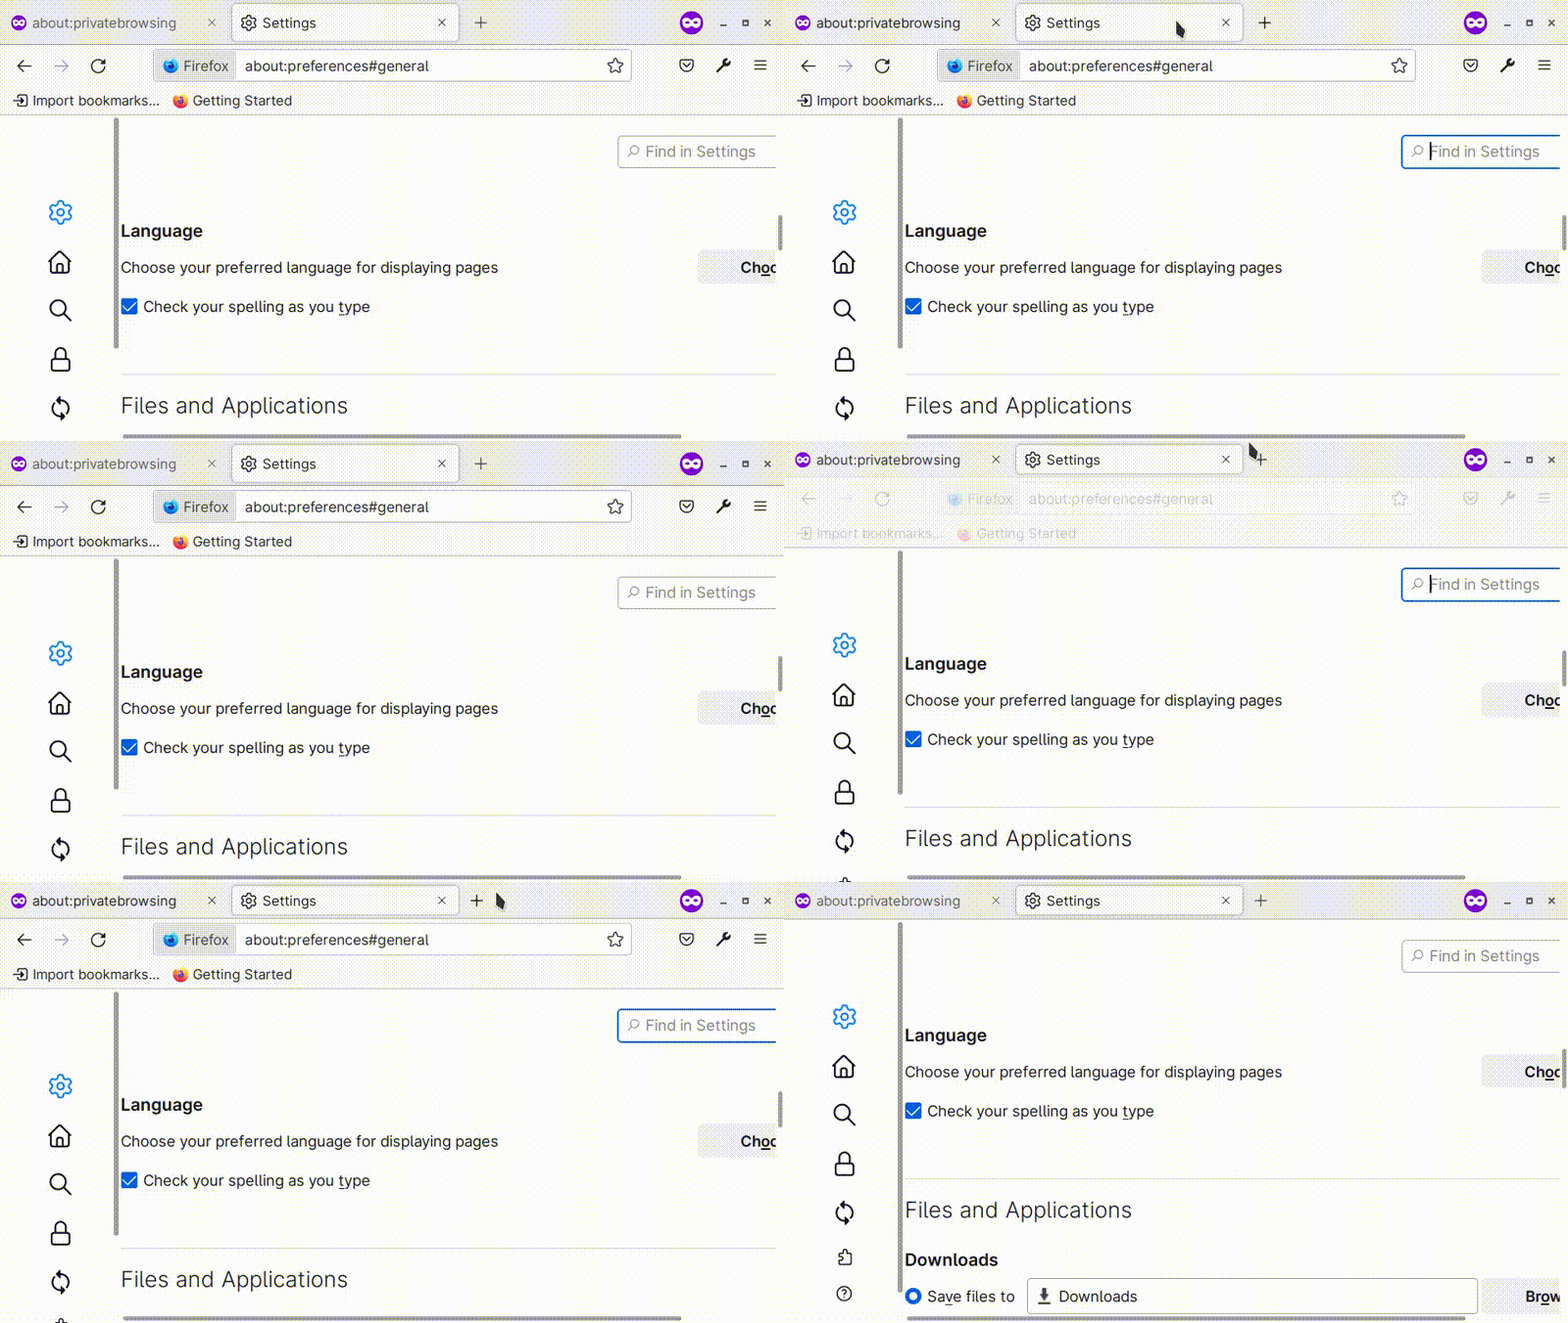
    <content type="html"><![CDATA[<p>Firefox的“刘海”真是越来越大了，垂直空间捉襟见肘．在<code><a href="https://www.userchrome.org/how-create-userchrome-css.html">userChrome.css</a></code>中添加下面的代码，可以在非全屏模式下也自动隐藏地址栏和书签栏（当光标移上去、按下Alt-D或处于新标签页时会重新出现），并让选项卡的高度缩小一点：</p><figure class="highlight css"><table><tr><td class="gutter"><pre><span class="line">1</span><br><span class="line">2</span><br><span class="line">3</span><br><span class="line">4</span><br><span class="line">5</span><br><span class="line">6</span><br><span class="line">7</span><br><span class="line">8</span><br><span class="line">9</span><br><span class="line">10</span><br><span class="line">11</span><br><span class="line">12</span><br></pre></td><td class="code"><pre><span class="line"><span class="selector-pseudo">:root</span><span class="selector-attr">[sessionrestored]</span></span><br><span class="line">     <span class="selector-id">#navigator-toolbox</span><span class="selector-pseudo">:not</span>(<span class="selector-attr">[inFullscreen=<span class="string">&quot;true&quot;</span>]</span>)<span class="selector-pseudo">:not</span>(<span class="selector-pseudo">:focus</span>-within)<span class="selector-pseudo">:not</span>(<span class="selector-pseudo">:hover</span>) <span class="selector-id">#nav-bar</span>,</span><br><span class="line"><span class="selector-pseudo">:root</span><span class="selector-attr">[sessionrestored]</span></span><br><span class="line">     <span class="selector-id">#navigator-toolbox</span><span class="selector-pseudo">:not</span>(<span class="selector-attr">[inFullscreen=<span class="string">&quot;true&quot;</span>]</span>)<span class="selector-pseudo">:not</span>(<span class="selector-pseudo">:focus</span>-within)<span class="selector-pseudo">:not</span>(<span class="selector-pseudo">:hover</span>) <span class="selector-id">#PersonalToolbar</span> &#123;</span><br><span class="line">    <span class="attribute">height</span>: <span class="number">0</span> <span class="meta">!important</span>;</span><br><span class="line">    <span class="attribute">min-height</span>: <span class="number">0</span> <span class="meta">!important</span>;</span><br><span class="line">    <span class="attribute">opacity</span>: <span class="number">0</span> <span class="meta">!important</span>;</span><br><span class="line">&#125;</span><br><span class="line"></span><br><span class="line"><span class="selector-id">#navigator-toolbox</span><span class="selector-pseudo">:not</span>(<span class="selector-attr">[inFullscreen=<span class="string">&quot;true&quot;</span>]</span>) &#123;</span><br><span class="line">    <span class="attr">--tab-min-height</span>: <span class="number">28px</span> <span class="meta">!important</span>;</span><br><span class="line">&#125;</span><br></pre></td></tr></table></figure><p>效果如图：</p><p><img src="https://i.loli.net/2021/09/12/HDB2u8bfQkgNL6G.gif" alt="firefox.gif"></p>]]></content>
    
    <summary type="html">


          &lt;p&gt;Firefox的“刘海”真是越来越大了，垂直空间捉襟见肘．在&lt;code&gt;&lt;a


    </summary>
    
      <category term="日常" scheme="https://0xclover.com/categories/%E6%97%A5%E5%B8%B8/"/>
    
    
      <category term="Firefox" scheme="https://0xclover.com/tags/Firefox/"/>
    
  </entry>
  
  <entry>
    <title>「逆否命题⟶原命题」（也）等价于排中律</title>
    <link href="https://0xclover.com/2021/08/contraposition/"/>
    <id>https://0xclover.com/2021/08/contraposition/</id>
    <published>2021-08-15T12:41:02.000Z</published>
    <updated>2024-11-05T15:30:28.714Z</updated>
    
    <content type="html"><![CDATA[<p>偶然看到这个问题：<a href="https://www.zhihu.com/question/63626246">为什么互为逆否的命题同真假？ - 知乎</a>，尝试证明如下：</p><figure class="highlight coq"><table><tr><td class="gutter"><pre><span class="line">1</span><br><span class="line">2</span><br><span class="line">3</span><br><span class="line">4</span><br><span class="line">5</span><br><span class="line">6</span><br><span class="line">7</span><br></pre></td><td class="code"><pre><span class="line"><span class="keyword">Definition</span> excluded_middle_statement := <span class="keyword">forall</span> (P : <span class="keyword">Prop</span>), P \/ ~P.</span><br><span class="line"><span class="keyword">Definition</span> double_negation_statement := <span class="keyword">forall</span> (P : <span class="keyword">Prop</span>), ~~P -&gt; P.</span><br><span class="line"><span class="keyword">Definition</span> contraposition_2 := <span class="keyword">forall</span> P Q, (~Q -&gt; ~P) -&gt; (P -&gt; Q).</span><br><span class="line"></span><br><span class="line"><span class="keyword">Theorem</span> excluded_middle_iff_contraposition_2 :</span><br><span class="line">  excluded_middle_statement &lt;-&gt; contraposition_2.</span><br><span class="line"><span class="keyword">Proof</span> <span class="built_in">with</span> <span class="built_in">try</span> <span class="built_in">tauto</span>. <span class="built_in">unfold</span> excluded_middle_statement, contraposition_2. <span class="built_in">split</span>; <span class="built_in">intros</span>. <span class="built_in">destruct</span> (H Q)... <span class="built_in">assert</span> double_negation_statement. &#123; <span class="built_in">intros</span> Q. <span class="built_in">specialize</span> (H True Q)... &#125; <span class="built_in">apply</span> H0... <span class="keyword">Qed</span>.</span><br></pre></td></tr></table></figure>]]></content>
    
    <summary type="html">


          &lt;p&gt;偶然看到这个问题：&lt;a


    </summary>
    
    
      <category term="数学" scheme="https://0xclover.com/tags/%E6%95%B0%E5%AD%A6/"/>
    
      <category term="Coq" scheme="https://0xclover.com/tags/Coq/"/>
    
  </entry>
  
  <entry>
    <title>简单使用mitmproxy捕获Android上的通讯内容</title>
    <link href="https://0xclover.com/2021/08/mitmproxy-android/"/>
    <id>https://0xclover.com/2021/08/mitmproxy-android/</id>
    <published>2021-08-13T22:15:10.000Z</published>
    <updated>2024-11-05T15:30:28.714Z</updated>
    
    <content type="html"><![CDATA[<h2 id="起因-a-name-sec1-a">起因<a name="sec1"></a></h2><p><strong>tl; dr</strong>: <strong>我需要使用mitmproxy截获微信的一些HTTP通讯内容</strong>（不需要修改），具体而言是某几个网页的源代码．如果你不知道什么是maimai，那么现在你可以直接跳到<a href="#sec2">第二节</a>啦．</p><p>起因其实是顺着某bot找到了这个<a href="https://www.diving-fish.com/maimaidx/prober/">舞萌 DX 查分器</a>，这里是它的<a href="https://www.diving-fish.com/maimaidx/prober_guide">使用方法</a>．很遗憾，这3种方法对此刻的我而言都有某种不便之处……不过，这3种方法的本质显然都是提取微信上某个网页的源代码，因此我研究之后选择用mitmproxy（Fiddler Everywhere要收费）人工截取数据，然后上传给查分器．</p><h2 id="启动mitmproxy-a-name-sec2-a">启动mitmproxy<a name="sec2"></a></h2><p>首先需要安装mitmproxy，用包管理器当然是最方便的：</p><figure class="highlight console"><table><tr><td class="gutter"><pre><span class="line">1</span><br></pre></td><td class="code"><pre><span class="line"><span class="meta prompt_"># </span><span class="language-bash">pacman -S mitmproxy</span></span><br></pre></td></tr></table></figure><p>mitmproxy提供3个命令：<code>mitmproxy</code>、<code>mitmweb</code>和<code>mitmdump</code>，分别是它的TUI、网页和CLI版本，这里我只用到后两者．直接在终端输入<code>mitmweb</code>即可启动：</p><figure class="highlight console"><table><tr><td class="gutter"><pre><span class="line">1</span><br><span class="line">2</span><br><span class="line">3</span><br></pre></td><td class="code"><pre><span class="line"><span class="meta prompt_"># </span><span class="language-bash">mitmweb</span></span><br><span class="line">Web server listening at http://127.0.0.1:8081/</span><br><span class="line">Proxy server listening at http://*:8080</span><br></pre></td></tr></table></figure><p>它会自动在浏览器中打开<code>http://127.0.0.1:8081/</code>，可以看到一个简单的抓包界面．接下来需要对手机进行配置．</p><h2 id="配置Android系统">配置Android系统</h2><p>这里不同厂商/版本/语言的Android肯定有差异，请自行适配．</p><p>首先需要让手机使用mitmproxy的代理．先让电脑和手机处于同一个网络下，然后打开Settings→Wi-Fi &amp; Network→Wi-Fi，点按当前使用的wifi右侧的齿轮进入Network details页面，然后点击右上角的铅笔，在Advanced options→Proxy中填入代理信息：种类为Manual，Proxy hostname为电脑的IP，Proxy port为8080．</p><p>然后需要导入根证书．在浏览器中打开<a href="http://mitm.it">http://mitm.it</a>这个网址（若不出意外，此时终端里应该显示一些连接的信息），按网页上的提示下载用于Android的证书．<strong>对于Android 11以上的版本</strong>，安装此证书的步骤为：打开Settings→Security &amp; Lock Screen→Encryption &amp; credentials→Install a certificate，种类选择CA certificate，然后选择刚才下载的证书文件即可．如果使用完毕要删除此证书，则要在Encryption &amp; credentials→Trusted credentials→User下操作．</p><p>为了测试配置是否正确，你可以使用Chrome（Firefox一贯只使用它自己的证书数据库）随便访问一个使用HTTPS加密的网站．如果Chrome没有报证书错误，而你在电脑的网页界面中能看到此次通讯的明文，说明你成功了．</p><h2 id="进行捕获">进行捕获</h2><p>首先当然要让微信在使用代理的情况下完成你需要捕获的通讯，因此请自行按需操作．不过如果你本来的目的跟我一样是<em>查分</em>，请回到<a href="#sec1">第一节</a>看链接里的“使用方法”．注意mitmproxy加、解密可能需要一段时间，请耐心等待网页加载完和/或多试几次．</p><h2 id="提取需要的数据">提取需要的数据</h2><p>估计mitmproxy已经捕获到完整的通讯过程后，就要想办法将真正需要的部分提取出来．</p><h3 id="方法一：使用filter">方法一：使用filter</h3><p>实际上在mitmproxy的网页界面上可以直接过滤出需要的flow．点击最上面的写着Search的搜索框，就会弹出一个各种filter的介绍，这里不详细说明了（因为我没有用过）．注意这些filter在mitmproxy的其余两种界面中同样可以使用．</p><h3 id="方法二：写一个addon">方法二：写一个addon</h3><p>点击网页界面左上角的蓝色mitmproxy按钮，选择弹出的菜单中的Save一项，将本次捕获的内容保存下来——下文假设你保存在了<code>./flows</code>．（这个文件也可以在网页界面中打开．）</p><p>这里只放一段代码，不介绍概念，如果你像我一样只是想查分应当可以原封不动地使用，否则可以按需修改：</p><figure class="highlight python"><table><tr><td class="gutter"><pre><span class="line">1</span><br><span class="line">2</span><br><span class="line">3</span><br><span class="line">4</span><br><span class="line">5</span><br><span class="line">6</span><br><span class="line">7</span><br><span class="line">8</span><br><span class="line">9</span><br><span class="line">10</span><br><span class="line">11</span><br><span class="line">12</span><br><span class="line">13</span><br><span class="line">14</span><br></pre></td><td class="code"><pre><span class="line"><span class="keyword">def</span> <span class="title function_">response</span>(<span class="params">flow</span>):</span><br><span class="line">    <span class="keyword">if</span> <span class="string">&#x27;diff=&#x27;</span> <span class="keyword">in</span> flow.request.path <span class="keyword">and</span> <span class="string">&#x27;text/html&#x27;</span> <span class="keyword">in</span> flow.response.headers[<span class="string">&#x27;content-type&#x27;</span>]:</span><br><span class="line">        <span class="built_in">print</span>(flow.request.path)</span><br><span class="line">        <span class="keyword">if</span> <span class="keyword">not</span> flow.response.content:</span><br><span class="line">            <span class="built_in">print</span>(<span class="string">&#x27;Empty reponse, skipping&#x27;</span>)</span><br><span class="line">            <span class="keyword">return</span></span><br><span class="line">        path = <span class="string">&#x27;./&#x27;</span> + flow.request.path.split(<span class="string">&#x27;&amp;&#x27;</span>)[-<span class="number">1</span>] + <span class="string">&#x27;.html&#x27;</span></span><br><span class="line">        <span class="keyword">try</span>:</span><br><span class="line">            <span class="keyword">with</span> <span class="built_in">open</span>(path, <span class="string">&#x27;w&#x27;</span>) <span class="keyword">as</span> f:</span><br><span class="line">                f.write(flow.response.content.decode())</span><br><span class="line">            <span class="built_in">print</span>(<span class="string">&#x27;Saved as&#x27;</span>, path)</span><br><span class="line">        <span class="keyword">except</span> Exception <span class="keyword">as</span> e:</span><br><span class="line">            <span class="built_in">print</span>(<span class="string">&#x27;Save error: &#x27;</span>)</span><br><span class="line">            <span class="built_in">print</span>(e)</span><br></pre></td></tr></table></figure><p>将其保存为<code>./print.py</code>，然后执行如下命令：</p><figure class="highlight console"><table><tr><td class="gutter"><pre><span class="line">1</span><br></pre></td><td class="code"><pre><span class="line"><span class="meta prompt_">$ </span><span class="language-bash">mitmdump -nqr flows -s print.py</span></span><br></pre></td></tr></table></figure><p>当前目录下的<code>diff=*.html</code>就是我们需要的那些网页文件了．</p><p>上述代码的作用是：对于每一个flow（其实是对于response这个事件），如果其请求的路径包含<code>diff=</code>，且响应的内容属于<code>text/html</code>类型，就将响应的内容保存在一个HTML文件中．想知道这些变量的具体类型和含义，比如<code>flow.response</code>，请参阅<a href="https://docs.mitmproxy.org/stable/api/mitmproxy/http.html#Response">官方文档</a>．</p><p>上面命令的参数含义如下：<code>-n</code>表示不启动代理服务；<code>-q</code>表示quiet，在这里主要作用是不显示每条flow的介绍（你可以去掉这个参数看看输出是什么样）；<code>-r</code>表示加载后面的文件中的flows；<code>-s</code>表示执行后面的脚本．详细的介绍请参看<code>mitmdump --help</code>．</p><h2 id="结语">结语</h2><p>因为我的需求仅仅只是提取几个微信<s>局域网</s>生态内的网页的源代码，所以这份介绍就到这里——更深入的我也不会．真正卡住我的其实是安装证书那一步，因为Android 11的“设置”中安装证书的入口至少有两处，然而只有正文中写的那个入口可以成功安装mitmproxy提供的根证书，另外搞懂addon的写法也稍微花了一点工夫．</p><p>然而使我大费周章的根源（之一）其实只是这样一句话：</p><blockquote><p>为了你的帐号安全，此微信号不能登录网页微信。</p></blockquote><p><em>Shame on you, WeChat.</em></p>]]></content>
    
    <summary type="html">


    </summary>
    
      <category term="日常" scheme="https://0xclover.com/categories/%E6%97%A5%E5%B8%B8/"/>
    
    
      <category term="网络" scheme="https://0xclover.com/tags/%E7%BD%91%E7%BB%9C/"/>
    
      <category term="抓包" scheme="https://0xclover.com/tags/%E6%8A%93%E5%8C%85/"/>
    
      <category term="mitmproxy" scheme="https://0xclover.com/tags/mitmproxy/"/>
    
      <category term="Android" scheme="https://0xclover.com/tags/Android/"/>
    
      <category term="maimai" scheme="https://0xclover.com/tags/maimai/"/>
    
      <category term="WeChatSucks" scheme="https://0xclover.com/tags/WeChatSucks/"/>
    
  </entry>
  
  <entry>
    <title>Gentoo 下搭建交叉编译环境——以 riscv64 为例</title>
    <link href="https://0xclover.com/2021/01/gentoo-riscv64-crossdev/"/>
    <id>https://0xclover.com/2021/01/gentoo-riscv64-crossdev/</id>
    <published>2021-01-20T00:00:00.000Z</published>
    <updated>2024-11-05T15:30:28.714Z</updated>
    
    <content type="html"><![CDATA[<p>虽然过程很简单但还是记录一下．</p><h3 id="安装crossdev">安装<code>crossdev</code></h3><figure class="highlight console"><table><tr><td class="gutter"><pre><span class="line">1</span><br></pre></td><td class="code"><pre><span class="line"><span class="meta prompt_"># </span><span class="language-bash">emerge -av sys-devel/crossdev</span></span><br></pre></td></tr></table></figure><h3 id="创建-overlay">创建 overlay</h3><p>然后先来建立一个 overlay，让<code>crossdev</code>自动把生成的 ebuild 放在里面<sup class="footnote-ref"><a href="#fn1" id="fnref1">[1]</a></sup>：</p><figure class="highlight console"><table><tr><td class="gutter"><pre><span class="line">1</span><br><span class="line">2</span><br><span class="line">3</span><br><span class="line">4</span><br></pre></td><td class="code"><pre><span class="line"><span class="meta prompt_"># </span><span class="language-bash"><span class="built_in">mkdir</span> -p /var/db/repos/cross-riscv64-linux-gnu/&#123;profiles,metadata&#125;</span></span><br><span class="line"><span class="meta prompt_"># </span><span class="language-bash"><span class="built_in">echo</span> <span class="string">&#x27;cross-riscv64-linux-gnu&#x27;</span> &gt; /var/db/repos/cross-riscv64-linux-gnu/profiles/repo_name</span></span><br><span class="line"><span class="meta prompt_"># </span><span class="language-bash"><span class="built_in">echo</span> <span class="string">&#x27;masters = gentoo&#x27;</span> &gt; /var/db/repos/cross-riscv64-linux-gnu/metadata/layout.conf</span></span><br><span class="line"><span class="meta prompt_"># </span><span class="language-bash"><span class="built_in">chown</span> -R portage:portage /var/db/repos/cross-riscv64-linux-gnu</span></span><br></pre></td></tr></table></figure><p>这里的<code>riscv64-linux-gnu</code>是<a href="https://clang.llvm.org/docs/CrossCompilation.html#target-triple">Target Triple</a>，后面还会用到．</p><p>注意如果用 Git 方式同步<code>gentoo</code>源（或者其他<code>Manifest</code>文件不含 ebuild 的校验码的方式），需要在<code>layout.conf</code>里添加一行：</p><figure class="highlight console"><table><tr><td class="gutter"><pre><span class="line">1</span><br></pre></td><td class="code"><pre><span class="line">echo &#x27;thin-manifests = true&#x27; &gt;&gt; /var/db/repos/cross-riscv64-linux-gnu/metadata/layout.conf</span><br></pre></td></tr></table></figure><p>最后启用这个 overlay．在<code>/etc/portage/repos.conf/crossdev.conf</code>中写入：</p><figure class="highlight ini"><table><tr><td class="gutter"><pre><span class="line">1</span><br><span class="line">2</span><br><span class="line">3</span><br><span class="line">4</span><br><span class="line">5</span><br></pre></td><td class="code"><pre><span class="line"><span class="section">[cross-riscv64-linux-gnu]</span></span><br><span class="line"><span class="attr">location</span> = /var/db/repos/cross-riscv64-linux-gnu</span><br><span class="line"><span class="attr">priority</span> = <span class="number">10</span></span><br><span class="line"><span class="attr">masters</span> = gentoo</span><br><span class="line"><span class="attr">auto-sync</span> = <span class="literal">no</span></span><br></pre></td></tr></table></figure><h3 id="构建工具链">构建工具链</h3><p>执行以下命令安装工具链：</p><figure class="highlight console"><table><tr><td class="gutter"><pre><span class="line">1</span><br></pre></td><td class="code"><pre><span class="line"><span class="meta prompt_"># </span><span class="language-bash">crossdev --stable --ex-gdb -t riscv64-linux-gnu -oS gentoo</span></span><br></pre></td></tr></table></figure><p>此处各个参数的含义如下：</p><ul><li><code>--stable</code>表示安装稳定 keyword 的版本，不带<code>--stable</code>会安装最新版（<code>~*</code>）；</li><li><code>--ex-gdb</code>表示除了 GCC 等基本工具外还要安装 GDB；</li><li><code>-t</code>指定 target triple，可以用<code>crossdev -t help</code>列出合法的值；</li><li><code>-oS</code>表示从哪些 overlay 里找 ebuild，这里指定<code>gentoo</code>是因为<code>crossdev</code>不知为什么默认会使用<code>gentoo-zh</code>里的<code>gdb</code>．</li></ul><p>可能会因为<code>/etc/portage/package.mask</code>等配置文件存在但不是目录而失败，这时只要把它们转换成目录即可（创建同名目录，把原来的配置文件变成目录下的一个普通文件）．</p><p>执行完该命令后会得到<code>/usr/riscv64-linux-gnu</code>这个目录．</p><p>可以试着编译一个简单的程序：</p><figure class="highlight console"><table><tr><td class="gutter"><pre><span class="line">1</span><br><span class="line">2</span><br><span class="line">3</span><br><span class="line">4</span><br><span class="line">5</span><br><span class="line">6</span><br><span class="line">7</span><br><span class="line">8</span><br><span class="line">9</span><br><span class="line">10</span><br><span class="line">11</span><br><span class="line">12</span><br><span class="line">13</span><br></pre></td><td class="code"><pre><span class="line"><span class="meta prompt_">$ </span><span class="language-bash"><span class="built_in">cd</span> /tmp</span></span><br><span class="line"><span class="meta prompt_">$ </span><span class="language-bash"><span class="built_in">cat</span> &gt; hello.c</span></span><br><span class="line"><span class="meta prompt_">#</span><span class="language-bash">include &lt;stdio.h&gt;</span></span><br><span class="line"></span><br><span class="line">int main()</span><br><span class="line">&#123;</span><br><span class="line">    printf(&quot;hello, world\n&quot;);</span><br><span class="line">&#125;</span><br><span class="line"><span class="meta prompt_">$ </span><span class="language-bash">riscv64-linux-gnu-gcc -o hello hello.c</span></span><br><span class="line"><span class="meta prompt_">$ </span><span class="language-bash">file hello</span></span><br><span class="line">hello: ELF 64-bit LSB pie executable, UCB RISC-V, version 1 (SYSV), dynamically linked, interpreter /lib/ld-linux-riscv64-lp64d.so.1, for GNU/Linux 4.15.0, not stripped</span><br><span class="line"><span class="meta prompt_">$ </span><span class="language-bash">./hello</span></span><br><span class="line">bash: ./hello: cannot execute binary file: Exec format error</span><br></pre></td></tr></table></figure><h2 id="安装-QEMU">安装 QEMU</h2><p>可以用 QEMU 来直接运行 riscv64 程序．首先要启用 QEMU 模拟 riscv64 架构的功能，比如在<code>/etc/portage/package.use</code>中添加</p><figure class="highlight plaintext"><table><tr><td class="gutter"><pre><span class="line">1</span><br></pre></td><td class="code"><pre><span class="line">app-emulation/qemu qemu_softmmu_targets_riscv64 qemu_user_targets_riscv64</span><br></pre></td></tr></table></figure><p>然后重新安装 QEMU：</p><figure class="highlight console"><table><tr><td class="gutter"><pre><span class="line">1</span><br></pre></td><td class="code"><pre><span class="line"><span class="meta prompt_"># </span><span class="language-bash">emerge -av qemu</span></span><br></pre></td></tr></table></figure><p>现在可以试着运行上面编译的<code>hello</code>程序：</p><figure class="highlight console"><table><tr><td class="gutter"><pre><span class="line">1</span><br><span class="line">2</span><br></pre></td><td class="code"><pre><span class="line"><span class="meta prompt_">$ </span><span class="language-bash">qemu-riscv64 -L /usr/riscv64-linux-gnu /tmp/hello</span></span><br><span class="line">hello, world</span><br></pre></td></tr></table></figure><hr class="footnotes-sep"><section class="footnotes"><ol class="footnotes-list"><li id="fn1" class="footnote-item"><p><a href="https://wiki.gentoo.org/wiki/Custom_ebuild_repository#Crossdev">https://wiki.gentoo.org/wiki/Custom_ebuild_repository#Crossdev</a> <a href="#fnref1" class="footnote-backref">↩︎</a></p></li></ol></section>]]></content>
    
    <summary type="html">


          &lt;p&gt;虽然过程很简单但还是记录一下．&lt;/p&gt;
&lt;h3


    </summary>
    
      <category term="日常" scheme="https://0xclover.com/categories/%E6%97%A5%E5%B8%B8/"/>
    
    
      <category term="Linux" scheme="https://0xclover.com/tags/Linux/"/>
    
      <category term="Gentoo" scheme="https://0xclover.com/tags/Gentoo/"/>
    
      <category term="交叉编译" scheme="https://0xclover.com/tags/%E4%BA%A4%E5%8F%89%E7%BC%96%E8%AF%91/"/>
    
      <category term="riscv64" scheme="https://0xclover.com/tags/riscv64/"/>
    
  </entry>
  
  <entry>
    <title>Quartus折腾记</title>
    <link href="https://0xclover.com/2020/09/thank-you-quartus/"/>
    <id>https://0xclover.com/2020/09/thank-you-quartus/</id>
    <published>2020-09-11T00:00:00.000Z</published>
    <updated>2024-11-05T15:30:28.714Z</updated>
    
    <content type="html"><![CDATA[<!-- more --><p>本文适用于如下软件版本：</p><ul><li>写作时间点的Gentoo Linux</li><li>Quartus Prime Lite 18.1</li></ul><p>在写作时间点，Quartus Prime的最新版本为20.1．如果你被允许使用新于本文的Quartus版本，建议<strong>优先使用新版本</strong>以减少兼容性问题．</p><p>如果你使用ArchLinux，可以尝试<strong>AUR中的相关包</strong>，无需手动安装，详见参考文献．</p><p>如果你不知道怎么在Quartus中创建一个工程，也不知道ModelSim是什么，那么你需要的不只是这份文档．本文的目的仅仅是教你<strong>如何在较新的Linux系统上使Quartus Prime Lite 18.1+ModelSim正常运行</strong>．</p><p>以下主要分为四个部分：下载安装、Quartus（本体）、ModelSim、USB Blaster．</p><h2 id="下载安装">下载安装</h2><p>软件可以直接从<a href="https://fpgasoftware.intel.com/18.1/?edition=lite&amp;platform=linux">Download Center for FPGAs</a>下载到（需注册）．直接下载<code>Quartus-lite-18.1.0.625-linux.tar</code>即可．</p><p>如果点击“I Agree”后没有自动开始下载，可以使用浏览器的“审查元素”截获产生的网络请求的响应内容．得到的链接无需登录，可以直接用<code>wget</code>等工具下载．这里不放出．</p><p>在网页上的“Updates”选项卡下可以下载到18.1.1.646版本的更新，只有安装完软件本体后才能装上．本文对应的是更新过的版本，但应该对未更新的版本也有效（未测试）．</p><p>下载完成后解压并执行<code>setup.sh</code>．在“Select Components”这一步注意<strong>不要</strong>选择“ModelSim - Intel FPGA Edition”（非Starter Edition），否则安装完后启动Quartus时会要求你提供许可．</p><h2 id="Quartus">Quartus</h2><p>安装完Quartus，桌面上应该会多出一个Quartus图标．但如果你使用的是Gentoo等软件版本较新的发行版，大概率是无法直接通过图标启动Quartus的．如果你试图使用命令行启动Quartus，你会得到如下的结果：</p><figure class="highlight console"><table><tr><td class="gutter"><pre><span class="line">1</span><br><span class="line">2</span><br></pre></td><td class="code"><pre><span class="line"><span class="meta prompt_">$ </span><span class="language-bash">./quartus</span></span><br><span class="line">quartus: error while loading shared libraries: libpng12.so.0: cannot open shared object file: No such file or directory</span><br></pre></td></tr></table></figure><p>这提示我们缺少<code>libpng-1.2</code>．因此只需要把它装上即可：</p><ul><li>对于Gentoo，安装<code>libpng-compat:1.2</code>．</li><li>对于其他发行版，安装<code>libpng12</code>或其他名字类似的包．</li></ul><p>这应该已经足够让Quartus跑起来了．</p><h3 id="ModelSim">ModelSim</h3><p>启动ModelSim才是困难的部分．</p><h4 id="设置路径">设置路径</h4><p>这一步非常重要．</p><p>首先创建一个工程和相应的Test Bench．打开Tools→Options，在General→EDA Tool Options下找到ModelSim-Altera这一项．把原本的目录换成：</p><figure class="highlight plaintext"><table><tr><td class="gutter"><pre><span class="line">1</span><br></pre></td><td class="code"><pre><span class="line">&lt;安装目录&gt;/intelFPGA_lite/18.1/modelsim_ase/bin</span><br></pre></td></tr></table></figure><p>为了确认，你填写的路径下应该有一个符号链接<code>vsim</code>，指向<code>../vco</code>．</p><p>（为什么不使用默认的<code>modelsim_ase/linuxaloem</code>？因为这个目录下是裸的二进制文件，我们接下来在脚本中配置的环境变量对它们无效．）</p><p>当你想单独启动ModelSim的时候，你也应该直接执行符号链接<code>vsim</code>．（但在你完成下面的步骤之前，你应该是没有办法做到这件事情的．）</p><h4 id="安装32位库">安装32位库</h4><p>现在试试Tools→Run Simulation Tool→RTL Simulation，不出所料应该会弹出一个错误提示：</p><blockquote><p><strong>Nativelink Error</strong><br>Can’t launch ModelSim-Altera Simulation software（中略）Check the NativeLink log file（中略）for detailed error messages</p></blockquote><!-- --><p>出现这个错误的原因是你安装的ModelSim是32位版本，而系统中没有安装所有它需要的32位库．你可以在<a href="https://wiki.archlinux.org/index.php/Altera_Design_Software#Install_dependencies">Install dependencies</a>中找到一个完整的列表，此处引用如下：</p><blockquote><p>Let us first install the native versions of the required packages: <code>expat</code> <code>fontconfig</code> <code>freetype2</code> <code>xorg-fonts-type1</code> <code>glibc</code> <code>gtk2</code> <code>libcanberra</code> <code>libpng</code> <code>libpng12</code> <code>libice</code> <code>libsm</code> <code>util-linux</code> <code>ncurses</code> <code>tcl</code> <code>tcllib</code><sup>AUR</sup> <code>zlib</code> <code>libx11</code> <code>libxau</code> <code>libxdmcp</code> <code>libxext</code> <code>libxft</code> <code>libxrender</code> <code>libxt</code> <code>libxtst</code> <code>ld-lsb</code>.<br>And the multilib versions: <code>lib32-expat</code> <code>lib32-fontconfig</code> <code>lib32-freetype2</code> <code>lib32-glibc</code> <code>lib32-gtk2</code> <code>lib32-libcanberra</code> <code>lib32-libpng</code> <code>lib32-libpng12</code> <code>lib32-libice</code> <code>lib32-libsm</code> <code>lib32-util-linux</code> <code>lib32-ncurses</code> <code>lib32-zlib</code> <code>lib32-libx11</code> <code>lib32-libxau</code> <code>lib32-libxdmcp</code> <code>lib32-libxext</code> <code>lib32-libxft</code> <code>lib32-libxrender</code> <code>lib32-libxt</code> <code>lib32-libxtst</code>.<br>You are now ready to install and launch Quartus Prime.</p></blockquote><!-- --><p>注意这些包名都是Arch Linux的，在其他发行版上可能有类似但不同的名字．在Gentoo上一部分包被称作<code>xxx-compat</code>，比如在我的机器上唯一缺少的库是<code>libncurses.so.5</code>，属于<code>ncurses-compat:5.9</code>．注意<code>lib32</code>前缀对应到USE flag<code>abi_x86_32</code>．</p><p>如果不确定，可以用下面的命令找出ModelSim需要但系统中缺少的库：</p><figure class="highlight console"><table><tr><td class="gutter"><pre><span class="line">1</span><br><span class="line">2</span><br></pre></td><td class="code"><pre><span class="line">cd &lt;安装目录&gt;/intelFPGA_lite/18.1/modelsim_ase/linuxaloem</span><br><span class="line">find . -executable -exec ldd &#123;&#125; + 2&gt; /dev/null | grep &#x27;not found&#x27;</span><br></pre></td></tr></table></figure><p>如果所有依赖都已经安装完毕，上述命令应该没有任何输出．</p><h4 id="修改vco">修改<code>vco</code></h4><p>安装了这么多包，胜利就在眼前了……？好像并不是这样．</p><p>再次执行RTL Simulation，尽管主窗口下半部分的Messages中显示<code>Successfully launched NativeLink simulation</code>，但除此之外什么也没有发生．</p><p>接下来我们需要许多命令行操作．请打开终端并切换到你刚刚在EDA Tool Options→ModelSim-Altera下填写的路径：</p><figure class="highlight console"><table><tr><td class="gutter"><pre><span class="line">1</span><br></pre></td><td class="code"><pre><span class="line">cd &lt;安装目录&gt;/intelFPGA_lite/18.1/modelsim_ase/bin</span><br></pre></td></tr></table></figure><p>现在执行<code>vsim</code>：</p><figure class="highlight console"><table><tr><td class="gutter"><pre><span class="line">1</span><br><span class="line">2</span><br></pre></td><td class="code"><pre><span class="line"><span class="meta prompt_">$ </span><span class="language-bash">./vsim</span></span><br><span class="line">Error: cannot find &quot;./../linux_rh60/vsim&quot;</span><br></pre></td></tr></table></figure><p>原来，<code>vsim</code>指向的<code>vco</code>是一个Shell脚本，其中对当前内核版本做了判断．对于未知的内核版本，它会从<code>../linux_rh60</code>这个不存在的位置寻找相应的二进制文件！现在修改这个脚本，让它找到正确的目录<code>../linux</code>，注意需要先对它加上写权限：</p><figure class="highlight console"><table><tr><td class="gutter"><pre><span class="line">1</span><br><span class="line">2</span><br></pre></td><td class="code"><pre><span class="line">chmod u+w ../vco</span><br><span class="line">sed -i &#x27;s/linux_rh60/linux/g&#x27; ../vco</span><br></pre></td></tr></table></figure><p>现在执行<code>./vsim</code>，应该不会报找不到<code>./../linux_rh60/vsim</code>的错误了——取而代之的是下面这个错误：</p><figure class="highlight plaintext"><table><tr><td class="gutter"><pre><span class="line">1</span><br><span class="line">2</span><br></pre></td><td class="code"><pre><span class="line">（前略）</span><br><span class="line">** Fatal: Read failure in vlm process (0,0)</span><br></pre></td></tr></table></figure><p>解决方案见下一节．</p><h4 id="FreeType和Fontconfig">FreeType和Fontconfig</h4><p>ArchWiki上已经提供了<a href="https://wiki.archlinux.org/index.php/Altera_Design_Software#With_freetype2_2.5.0.1-1">对该错误的解决方案</a>．简而言之，这是FreeType版本过新引起的错误．然而对于较新的发行版，官方源中已经难以找到相应版本的库了．如果你使用其他发行版，可能可以从一些存档网站找到旧版的包；而如果你使用Gentoo，那么你需要手动<a href="http://download.savannah.gnu.org/releases/freetype/freetype-2.4.12.tar.bz2">下载freetype-2.4.12.tar.bz2</a>并编译——注意你需要的是32位库．</p><p><a href="https://mil.ufl.edu/3701/docs/quartus/linux/ModelSim_linux.pdf">A Guide on Getting ModelSim to Work on Linux</a>提供了此处的详细步骤（稍有改动）：</p><figure class="highlight console"><table><tr><td class="gutter"><pre><span class="line">1</span><br><span class="line">2</span><br><span class="line">3</span><br><span class="line">4</span><br><span class="line">5</span><br></pre></td><td class="code"><pre><span class="line">cd ~/Downloads</span><br><span class="line">tar jxvf freetype-2.4.12.tar.bz2</span><br><span class="line">cd freetype-2.4.12</span><br><span class="line">./configure --build=i686-pc-linux-gnu &quot;CFLAGS=-m32&quot; &quot;CXXFLAGS=-m32&quot; &quot;LDFLAGS=-m32&quot;</span><br><span class="line">make -j8</span><br></pre></td></tr></table></figure><p>然后回到<code>&lt;安装目录&gt;/intelFPGA_lite/18.1/modelsim_ase</code>，执行：</p><figure class="highlight console"><table><tr><td class="gutter"><pre><span class="line">1</span><br><span class="line">2</span><br></pre></td><td class="code"><pre><span class="line">mkdir lib32</span><br><span class="line">cp ~/Downloads/freetype-2.4.12/objs/.libs/libfreetype.so* ./lib32</span><br></pre></td></tr></table></figure><p>接下来，你需要让ModelSim使用你刚刚编译的FreeType库．而且因为这个库版本太老，我们不希望把它直接安装在系统中．打开<code>../vco</code>，找到这一行：</p><figure class="highlight sh"><table><tr><td class="gutter"><pre><span class="line">1</span><br></pre></td><td class="code"><pre><span class="line"><span class="built_in">dir</span>=`<span class="built_in">dirname</span> <span class="variable">$arg0</span>`</span><br></pre></td></tr></table></figure><p>在后面添加一行：</p><figure class="highlight sh"><table><tr><td class="gutter"><pre><span class="line">1</span><br></pre></td><td class="code"><pre><span class="line"><span class="built_in">export</span> LD_LIBRARY_PATH=<span class="variable">$&#123;dir&#125;</span>/lib32</span><br></pre></td></tr></table></figure><p>重新运行<code>./vsim</code>……等一下，怎么还是报错？</p><figure class="highlight console"><table><tr><td class="gutter"><pre><span class="line">1</span><br><span class="line">2</span><br><span class="line">3</span><br></pre></td><td class="code"><pre><span class="line"><span class="meta prompt_">$ </span><span class="language-bash">./vsim</span></span><br><span class="line">（前略）</span><br><span class="line">** Fatal: Read failure in vlm process (0,0)</span><br></pre></td></tr></table></figure><p>这其实是因为Fontconfig与FreeType的版本不匹配（可以使用GDB跟踪发现）．万能的ArchWiki上又提供了解决方案：使用<code>fontconfig-2.12.6</code>．</p><p>取得旧版本fontconfig的方法与上面大致相同．如果你直接编译，可以使用以下命令：</p><figure class="highlight console"><table><tr><td class="gutter"><pre><span class="line">1</span><br><span class="line">2</span><br><span class="line">3</span><br><span class="line">4</span><br></pre></td><td class="code"><pre><span class="line">mkdir image</span><br><span class="line">./configure --build=i686-pc-linux-gnu --host=i686-pc-linux-gnu --disable-static --disable-docs --prefix=$&#123;PWD&#125;/image</span><br><span class="line">make -j8</span><br><span class="line">make install # 当屏幕上显示fc-cache -s -f -v时就可以Ctrl-C了</span><br></pre></td></tr></table></figure><p>则安装产生的<strong>目录结构</strong>位于<code>./image</code>．</p><p>如果你使用Gentoo，也可以让Portage帮你编译：</p><figure class="highlight console"><table><tr><td class="gutter"><pre><span class="line">1</span><br><span class="line">2</span><br></pre></td><td class="code"><pre><span class="line">cd /var/db/repos/gentoo/media-libs/fontconfig</span><br><span class="line">PORTAGE_TMPDIR=/tmp USE=abi_x86_32 ebuild fontconfig-2.12.6.ebuild clean install</span><br></pre></td></tr></table></figure><p>这会把旧版的<code>fontconfig</code>安装到<code>/tmp/portage/media-libs/fontconfig-2.12.6/image</code>这个目录中．其中<code>usr/lib</code>下的才是32位库，可以用<code>file</code>命令确认：</p><figure class="highlight console"><table><tr><td class="gutter"><pre><span class="line">1</span><br><span class="line">2</span><br></pre></td><td class="code"><pre><span class="line"><span class="meta prompt_">$ </span><span class="language-bash">file libfontconfig.so.1.10.1</span></span><br><span class="line">libfontconfig.so.1.10.1: ELF 32-bit LSB shared object, Intel 80386, version 1 (SYSV), dynamically linked, stripped</span><br></pre></td></tr></table></figure><p>接下来把所有的32位<code>so</code>文件转移到<code>lib32</code>下，再一次启动<code>vsim</code>．</p><p>如果你成功了——别急，先试试RTL Simulation．如果也没有问题，恭喜，你不需要看下去了；上面编译Fontconfig的目录也可以删掉了．</p><p>如果没有成功——请不要删除上面得到的<code>image</code>目录．它对我们还有用处．</p><h4 id="修改fonts-conf">修改<code>fonts.conf</code></h4><p>网上大多数资料顶多只告诉你降级fontconfig这一步．但很不幸，我做完上述步骤（实际上不包括更改ModelSim-Altera所在路径这一步）后还是卡住了：</p><figure class="highlight console"><table><tr><td class="gutter"><pre><span class="line">1</span><br><span class="line">2</span><br><span class="line">3</span><br></pre></td><td class="code"><pre><span class="line"><span class="meta prompt_">$ </span><span class="language-bash">./vsim</span></span><br><span class="line">Reading pref.tcl</span><br><span class="line">Fontconfig error: Cannot load default config file</span><br></pre></td></tr></table></figure><p>然后终端就……没有反应了．没有输出，<code>vsim</code>也不会自己结束，只能<code>C-z</code>然后<code>kill %1</code>．</p><p>启发我的是<strong>放置N分钟后ModelSim的GUI突然成功显示</strong>这件事．类似的现象我在另一个软件上也遇到过：<a href="https://github.com/telegramdesktop/tdesktop/issues/4240">Telegram starts slow on Linux · Issue #4240 · telegramdesktop/tdesktop</a>，而当时的情况跟现在如出一辙：软件使用了（bundle了）比系统版本更低的fontconfig！而之所以ModelSim需要花费这么长的时间来启动，想必是因为它需要时间来重新缓存所有的字体．</p><p>具体排查过程略过，最后的解决方案是从刚刚的<code>image</code>目录（即旧版<code>fontconfig</code>安装的目录）找到<code>etc/fonts.conf</code>，把它复制到<code>~/.fonts.conf.legacy</code>，然后编辑复制得到的文件．</p><p>一方面我们不需要它缓存太多字体．ModelSim在我的机器上只用到<code>Courier</code>和<code>unifont</code>这两个字体，因此可以删去原有的</p><figure class="highlight xml"><table><tr><td class="gutter"><pre><span class="line">1</span><br><span class="line">2</span><br><span class="line">3</span><br></pre></td><td class="code"><pre><span class="line"><span class="tag">&lt;<span class="name">dir</span>&gt;</span>/usr/share/fonts<span class="tag">&lt;/<span class="name">dir</span>&gt;</span></span><br><span class="line"><span class="tag">&lt;<span class="name">dir</span> <span class="attr">prefix</span>=<span class="string">&quot;xdg&quot;</span>&gt;</span>fonts<span class="tag">&lt;/<span class="name">dir</span>&gt;</span></span><br><span class="line"><span class="tag">&lt;<span class="name">dir</span>&gt;</span>~/.fonts<span class="tag">&lt;/<span class="name">dir</span>&gt;</span></span><br></pre></td></tr></table></figure><p>等行，换成</p><figure class="highlight xml"><table><tr><td class="gutter"><pre><span class="line">1</span><br><span class="line">2</span><br></pre></td><td class="code"><pre><span class="line"><span class="tag">&lt;<span class="name">dir</span>&gt;</span>/usr/share/fonts/unifont<span class="tag">&lt;/<span class="name">dir</span>&gt;</span></span><br><span class="line"><span class="tag">&lt;<span class="name">dir</span>&gt;</span>/usr/share/fonts/Type1<span class="tag">&lt;/<span class="name">dir</span>&gt;</span></span><br></pre></td></tr></table></figure><p>如果有其他需要缓存的字体目录，也可以在这里加入．</p><p>另一方面，我们不希望让旧版、新版Fontconfig的字体缓存混在一起，因此我们创建一个新的缓存目录：</p><figure class="highlight console"><table><tr><td class="gutter"><pre><span class="line">1</span><br></pre></td><td class="code"><pre><span class="line">mkdir ~/.cache/fontconfig-old</span><br></pre></td></tr></table></figure><p>然后再次编辑<code>~/.fonts.conf.legacy</code>，去掉原来的缓存设置：</p><figure class="highlight xml"><table><tr><td class="gutter"><pre><span class="line">1</span><br><span class="line">2</span><br><span class="line">3</span><br></pre></td><td class="code"><pre><span class="line"><span class="tag">&lt;<span class="name">cachedir</span>&gt;</span>/tmp/fontconfig-2.12.6/image/var/cache/fontconfig<span class="tag">&lt;/<span class="name">cachedir</span>&gt;</span></span><br><span class="line"><span class="tag">&lt;<span class="name">cachedir</span> <span class="attr">prefix</span>=<span class="string">&quot;xdg&quot;</span>&gt;</span>fontconfig<span class="tag">&lt;/<span class="name">cachedir</span>&gt;</span></span><br><span class="line"><span class="tag">&lt;<span class="name">cachedir</span>&gt;</span>~/.fontconfig<span class="tag">&lt;/<span class="name">cachedir</span>&gt;</span></span><br></pre></td></tr></table></figure><p>然后加上</p><figure class="highlight xml"><table><tr><td class="gutter"><pre><span class="line">1</span><br></pre></td><td class="code"><pre><span class="line"><span class="tag">&lt;<span class="name">cachedir</span>&gt;</span>~/.cache/fontconfig-old<span class="tag">&lt;/<span class="name">cachedir</span>&gt;</span></span><br></pre></td></tr></table></figure><p>保存！</p><p>接下来再编辑<code>vco</code>（如果一开始没有更改ModelSim-Altera工具的路径，就会产生命令行中执行<code>./vsim</code>可以调出GUI，但无法由Quartus启动ModelSim的现象），在我们曾经编辑过的<code>export LD_LIBRARY_PATH=$&#123;dir&#125;/lib32</code>这一行下面，添加一行</p><figure class="highlight sh"><table><tr><td class="gutter"><pre><span class="line">1</span><br></pre></td><td class="code"><pre><span class="line"><span class="built_in">export</span> FONTCONFIG_FILE=<span class="string">&quot;<span class="variable">$&#123;HOME&#125;</span>/.fonts.conf.legacy&quot;</span></span><br></pre></td></tr></table></figure><p>这样，我们的ModelSim不但使用了正确的旧版32位<code>fontconfig-2.12.6</code>，还使用了适合这个旧版Fontconfig的配置文件．还有什么理由阻止ModelSim的启动呢？</p><p>现在再分别试试<code>./vsim</code>和<code>RTL Simulation</code>吧！如果依然失败……</p><p><del>要不，出去买张彩票？</del></p><h2 id="USB-Blaster">USB Blaster</h2><p>这一部分不需要很多特别的设置，以下内容来自ArchWiki：</p><p>编辑<code>/etc/udev/rules.d/51-altera-usb-blaster.rules</code>，添加：</p><figure class="highlight plaintext"><table><tr><td class="gutter"><pre><span class="line">1</span><br><span class="line">2</span><br><span class="line">3</span><br><span class="line">4</span><br><span class="line">5</span><br></pre></td><td class="code"><pre><span class="line">SUBSYSTEM==&quot;usb&quot;, ATTR&#123;idVendor&#125;==&quot;09fb&quot;, ATTR&#123;idProduct&#125;==&quot;6001&quot;, MODE=&quot;0666&quot;</span><br><span class="line">SUBSYSTEM==&quot;usb&quot;, ATTR&#123;idVendor&#125;==&quot;09fb&quot;, ATTR&#123;idProduct&#125;==&quot;6002&quot;, MODE=&quot;0666&quot;</span><br><span class="line">SUBSYSTEM==&quot;usb&quot;, ATTR&#123;idVendor&#125;==&quot;09fb&quot;, ATTR&#123;idProduct&#125;==&quot;6003&quot;, MODE=&quot;0666&quot;</span><br><span class="line">SUBSYSTEM==&quot;usb&quot;, ATTR&#123;idVendor&#125;==&quot;09fb&quot;, ATTR&#123;idProduct&#125;==&quot;6010&quot;, MODE=&quot;0666&quot;</span><br><span class="line">SUBSYSTEM==&quot;usb&quot;, ATTR&#123;idVendor&#125;==&quot;09fb&quot;, ATTR&#123;idProduct&#125;==&quot;6810&quot;, MODE=&quot;0666&quot;</span><br></pre></td></tr></table></figure><p>然后重新加载udev rules：</p><figure class="highlight console"><table><tr><td class="gutter"><pre><span class="line">1</span><br></pre></td><td class="code"><pre><span class="line"><span class="meta prompt_"># </span><span class="language-bash">udevadm control --reload</span></span><br></pre></td></tr></table></figure><p>如果依然无法检测到设备，请参考<a href="https://wiki.archlinux.org/index.php/Altera_Design_Software#USB_Blaster_not_working">USB Blaster not working</a>．</p><h2 id="Troubleshooting">Troubleshooting</h2><h3 id="Failed-to-obtain-lock-couldn-t-open-home-USER-modelsim-lock-file-already-exists"><code>Failed to obtain lock: couldn't open &quot;/home/&lt;USER&gt;/.modelsim_lock&quot;: file already exists</code></h3><p>用<code>ps</code>找出所有<code>vsim</code>相关进程并<code>kill</code>掉，然后删除该文件即可．</p><h3 id="ModelSim字体太小">ModelSim字体太小</h3><p>这是小问题．在Tools→Edit Preferences→Fonts中换用<strong>大</strong>号字体即可．注意应用设置后的实际显示大小可能比预览的要小．</p><h2 id="参考文献">参考文献</h2><ol><li><a href="https://wiki.archlinux.org/index.php/Altera_Design_Software">Altera Design Software - ArchWiki</a></li><li><a href="https://mil.ufl.edu/3701/docs/quartus/linux/ModelSim_linux.pdf">A Guide on Getting ModelSim to Work on Linux</a></li><li><a href="https://twoerner.blogspot.com/2017/10/running-modelsim-altera-from-quartus.html">DoodleTs: Running ModelSim-Altera from the Quartus Prime Lite IDE under Linux</a></li></ol>]]></content>
    
    <summary type="html">
    
      某门课程需要用到Quartus和ModelSim．虽然官方友好地提供了Linux版本，但让旧版的软件在最新的系统上跑起来也需要一番工夫．
    
    </summary>
    
      <category term="日常" scheme="https://0xclover.com/categories/%E6%97%A5%E5%B8%B8/"/>
    
    
      <category term="Linux" scheme="https://0xclover.com/tags/Linux/"/>
    
      <category term="基建" scheme="https://0xclover.com/tags/%E5%9F%BA%E5%BB%BA/"/>
    
      <category term="Quartus" scheme="https://0xclover.com/tags/Quartus/"/>
    
  </entry>
  
  <entry>
    <title>Hello Gentoo, My Old Friend</title>
    <link href="https://0xclover.com/2020/05/hello-gentoo/"/>
    <id>https://0xclover.com/2020/05/hello-gentoo/</id>
    <published>2020-05-02T00:00:00.000Z</published>
    <updated>2024-11-05T15:30:28.714Z</updated>
    
    <content type="html"><![CDATA[<h2 id="引子">引子</h2><p>听说不少人一放假就喜欢装黑苹果，然而手上并没有Hackintosh-friendly的机器的我，只能用重装Gentoo的方式来祭奠一下逝去的青春啦（悲）。</p><p>这里随便记录一些安装和配置过程中的琐事，便于日后查询。</p><p>持续更新中。</p><span id="more"></span><h2 id="Major-Changes-since-2019">Major Changes (since 2019?)</h2><h3 id="Portage">Portage</h3><ul><li>由portage管理的源（？）的默认位置统一移到了<code>/var/db/repos</code>，官方源（原<code>/usr/portage</code>）现在在<code>/var/db/repos/gentoo</code>。</li><li><code>emerge</code>现在不会再默认帮你选择一个作为依赖安装的不稳定包的版本了，如果需要的话要加上参数<code>--autounmask=y</code>。<ul><li>这实际上是https://bugs.gentoo.org/658648.</li></ul></li></ul><h3 id="Non-Portage">Non-Portage</h3><ul><li>本来安装流程里<code>/etc/timezone</code>是个符号链接，现在它变成了一个文本文件，里面直接写时区，比如<code>Asia/Tokyo</code>。</li></ul><h2 id="配置">配置</h2><h3 id="全盘加密（LUKS）">全盘加密（LUKS）</h3><p>这里有一个Handbook里没有明确指出的地方：如果你使用systemd，需要启用<code>cryptsetup</code>这个USE。</p><p>否则你是没有<code>systemd-cryptsetup-generator</code>来帮你生成<code>systemd-cryptsetup@.service</code>的，这样你的分区就没有办法在启动时被解密。</p><h3 id="Overlay">Overlay</h3><ul><li><p>以前overlay一般交给<code>layman</code>管理，缺点是<code>layman -S</code>需要在<code>eix-sync</code>之前单独执行。（还是我的用法不对？）<br>这次读wiki的时候发现了<code>eselect repository</code>（<code>app-eselect/eselect-repository</code>）这个新玩意，用法很简单：</p><ul><li><code>eselect repository list</code>列出所有repo；</li><li><code>eselect repository enable/disable</code>启用或禁用某个repo。注意这并不会把该repo的内容同步下来，所以你还要运行一次<code>eix-sync</code>。</li></ul><p>这样启用的repo的配置可以在<code>/etc/portage/repos.conf/eselect-repo.conf</code>里找到。</p><ul><li>FYI：在<a href="https://repos.gentoo.org">repos.gentoo.org</a>可以看到一个现存repo的列表，并且区分了官方和非官方源。</li></ul></li><li><p>一个overlay里常常有一大堆的包，而你一般只需要其中的少数几个。为了防止这种“命名空间污染”和可能带来的依赖问题，可以每添加一个overlay就在<code>package.mask</code>里加上：</p><figure class="highlight txt"><table><tr><td class="gutter"><pre><span class="line">1</span><br></pre></td><td class="code"><pre><span class="line">*/*::name-of-the-overlay</span><br></pre></td></tr></table></figure><p>然后只把需要的包unmask掉即可。</p><ul><li><strong>注</strong>：实际上这种做法可能不小心unmask掉该overlay在profiles里面mask掉的包。当然你也可以只unmask掉你需要的版本，但这样比较麻烦，而且包不会被自动更新。</li><li>为了同样的目的有时还需要设置不同源的优先级。注意overlay默认优先级是比<code>gentoo</code>要高的。</li></ul></li></ul><h3 id="蓝牙">蓝牙</h3><p>按照wiki上操作即可，但要记得启用<code>bluetooth.service</code>（systemd）。</p><h3 id="NVIDIA-Optimus">NVIDIA Optimus</h3><p>已经有有热心人士为Gentoo打包了Optimus Manager（见<a href="https://gpo.zugaina.org/Search?search=optimus-manager">gpo.zugaina.org</a>），直接用上面的方法添加<code>jorgicio</code>这个源并安装<code>optimus-manager</code>及<code>optimus-manager-qt</code>即可。</p><p>安装完以后做以下两件事：</p><ul><li><code>/usr/bin/prime-switch-boot</code>这个脚本需要Python ≥ 3.7，如果执行<code>python3</code>启动的是较低的版本，需要在<code>eselect python</code>里切换到3.7以上。</li><li>创建<code>/etc/X11/xorg.conf.d</code>目录，<code>optimus-manager</code>需要在那里生成配置文件。</li></ul><p>然后让<code>optimus-manager.service</code>和<code>optimus-manager-qt</code>自动启动即可。如果显示Hybrid模式并能启动<code>nvidia-settings</code>说明成功了。</p><h2 id="软件">软件</h2><h3 id="Haskell">Haskell</h3><p>建议添加<code>haskell</code>这个overlay（同样由官方维护），里面有最新的GHC。</p><p>想省下编译GHC的时间，启用<code>binary</code>这个USE即可。</p><p>另外，建议全部相关的包都使用<code>haskell</code>源里的版本而非<code>gentoo</code>里的版本，否则可能产生循环依赖等问题。</p><h3 id="npm">npm</h3><p>直接安装<code>net-libs/nodejs</code>即可。但官方不推荐越过portage安装全局包，作为workaround可以在<code>~/.npmrc</code>里加上这么一行：</p><figure class="highlight plaintext"><table><tr><td class="gutter"><pre><span class="line">1</span><br></pre></td><td class="code"><pre><span class="line">prefix=/home/&lt;USER&gt;/.node</span><br></pre></td></tr></table></figure><p>然后把相应路径添加到<code>$PATH</code>里。</p><h3 id="Wine">Wine</h3><p>官方源里现在有四个版本的Wine本体：<code>virtual/wine</code>和<code>app-emulation/wine-&#123;vanilla,staging,any&#125;</code>。官方推荐直接安装<code>virtual/wine</code>即可，它会按照你的USE flag自动选择合适的wine版本（有<code>staging</code>时优先选择<code>wine-staging</code>，否则优先选择<code>wine-vanilla</code>）。</p><p>但我明明在<code>package.use</code>里加了<code>staging</code>啊，为什么还是自动选择了<code>wine-vanilla</code>？</p><p><code>emerge</code>表示<code>staging</code>并没有启用并且画了个括号（<code>(-staging)</code>）。百度了一下发现大概是这个USE flag被禁用的意思。原来在我的profile（<code>/var/db/repos/gentoo/profiles/arch/amd64/package.use.stable.mask</code>）里面有这么一行：</p><figure class="highlight plaintext"><table><tr><td class="gutter"><pre><span class="line">1</span><br></pre></td><td class="code"><pre><span class="line">virtual/wine staging</span><br></pre></td></tr></table></figure><p>解决方案也很简单，在<code>package.accept_keywords</code>里加上<code>virtual/wine ~amd64</code>就行了。</p><h3 id="Firefox">Firefox</h3><h4 id="字体fallback不正确">字体fallback不正确</h4><p>如果Firefox会在某些时候选择错误的字体——比如，用<code>sans-serif</code>显示一段中文，当<code>font-weight</code>是<code>400</code>、<code>500</code>、<code>600</code>的时候用的字体各不相同（！），试着在<code>about:config</code>里把<code>gfx.font_rendering.fontconfig.max_generic_substitutions</code>调成一个较大的值。</p><h2 id="杂项">杂项</h2><h3 id="fsck-f2fs"><code>fsck.f2fs</code></h3><p>装完系统以后发现启动异常地快（本来<code>fsck.f2fs</code>在内核版本变更的时候会花很长时间来进行检查），看日志（<code>journalctl -u systemd-fsck-root.service</code>）发现根文件系统的检查直接被跳过了：</p><blockquote><pre><code>fsck.f2fs doesn't exist, not checking file system.</code></pre></blockquote><p>原来其他的<code>fsck</code>们都在<code>/sbin</code>里，而<code>fsck.f2fs</code>在<code>/usr/sbin</code>下面（为啥呢……），所以没有被默认包含在initramfs里面。所以我们只需要在<code>dracut.conf</code>里加上（详见<code>dracut.conf (5)</code>）</p><figure class="highlight plaintext"><table><tr><td class="gutter"><pre><span class="line">1</span><br></pre></td><td class="code"><pre><span class="line">fscks=&quot;umount mount /usr/sbin/fsck* /sbin/fsck* xfs_db xfs_check xfs_repair e2fsck jfs_fsck reiserfsck btrfsck&quot;</span><br></pre></td></tr></table></figure><p>然后<code>dracut --force</code>重新构建initramfs即可。</p><h3 id="保存编译进度">保存编译进度</h3><p><code>FEATURES=&quot;keepwork&quot;</code>，用完以后<strong>记得关上</strong>，不然编译产生的临时文件会一直积累。</p><p>这个功能好像存在很久很久了，为什么我之前都不知道（悲）。</p><h3 id="KDE-Application-Menu-Button-Does-Not-Work-for-Electron-Apps">KDE Application Menu Button Does Not Work for Electron Apps</h3><p>解决方案在<a href="https://github.com/electron/electron/issues/10532">这里</a>：安装<code>dev-libs/libdbusmenu</code>即可（我启用了gtk和gtk3两个USE flag）。</p><p><strong>注</strong> 这是KDE的一个小功能，可以把窗口的菜单栏变成titlebar上的一个按钮。你可以在System Settings的Application Style-&gt;Window Decorations-&gt;Titlebar Buttons里找到它。</p><h2 id="一些有趣的包">一些有趣的包</h2><h3 id="cppman-（app-doc-cppman）">cppman （<code>app-doc/cppman</code>）</h3><p>C++文档from <a href="http://cpluscplus.com">cpluscplus.com</a> &amp; <a href="http://cppreference.com">cppreference.com</a>，详见<a href="https://github.com/aitjcize/cppman">https://github.com/aitjcize/cppman</a>。</p><h2 id="碎碎念">碎碎念</h2><ul><li>虽然很多官方源里缺少的包在overlay里可以找到，但比较分散，而且找overlay还要借助<!-- --><a href="http://gpo.zugaina.org">gpo.zugaina.org</a>，总体确实不如AUR方便。</li><li><s>编译耗时太长了</s> <s>都用Gentoo了还在意编译时长</s></li><li>拿到静态库比Arch容易太多了（虽然主要是交作业需要），启用<code>static-libs</code>即可。<ul><li>题外话：由于Arch坚持只ship动态库的做法，官方源里一个叫<code>haskell-yesod-default</code>的包在本文写作时间点的版本号达到了惊人的<code>1.2.0-**732**</code>，真是活久见。</li></ul></li><li><code>eix</code>打起来比<code>pacman -Ss</code>快多了——这一点当然很重要，要知道有个函数叫<code>creat</code>……</li><li><code>media-fonts</code>下面那一堆<code>~amd64</code>的keyword有点让人疑惑（尤其是{un,}stable共存的）：一个<em>unstable</em>的字体是啥样的啊……</li></ul><h2 id="后续计划">后续计划</h2><p>LFS（逃）</p>]]></content>
    
    <summary type="html">
    
      &lt;h2 id=&quot;引子&quot;&gt;引子&lt;/h2&gt;
&lt;p&gt;听说不少人一放假就喜欢装黑苹果，然而手上并没有Hackintosh-friendly的机器的我，只能用重装Gentoo的方式来祭奠一下逝去的青春啦（悲）。&lt;/p&gt;
&lt;p&gt;这里随便记录一些安装和配置过程中的琐事，便于日后查询。&lt;/p&gt;
&lt;p&gt;持续更新中。&lt;/p&gt;
    
    </summary>
    
      <category term="日常" scheme="https://0xclover.com/categories/%E6%97%A5%E5%B8%B8/"/>
    
    
      <category term="Linux" scheme="https://0xclover.com/tags/Linux/"/>
    
      <category term="基建" scheme="https://0xclover.com/tags/%E5%9F%BA%E5%BB%BA/"/>
    
      <category term="Gentoo" scheme="https://0xclover.com/tags/Gentoo/"/>
    
  </entry>
  
  <entry>
    <title>Nextcloud更新到版本18时报错</title>
    <link href="https://0xclover.com/2020/01/nextcloud-upgrade/"/>
    <id>https://0xclover.com/2020/01/nextcloud-upgrade/</id>
    <published>2020-01-31T00:00:00.000Z</published>
    <updated>2024-11-05T15:30:28.714Z</updated>
    
    <content type="html"><![CDATA[<p>手贱把Nextcloud从17.0.2更新到了18.0.0 (Beta Channel)，结果<code>occ upgrade</code>的时候fail在下面这个错误上：</p><figure class="highlight console"><table><tr><td class="gutter"><pre><span class="line">1</span><br></pre></td><td class="code"><pre><span class="line">SQLSTATE[42S22]: Column not found: 1054 Unknown column &#x27;entity&#x27; in &#x27;where clause&#x27;</span><br></pre></td></tr></table></figure><p>幸而手动加上这一列以后就能正常完成更新了，顺带复习了一下SQL（逃</p><figure class="highlight sql"><table><tr><td class="gutter"><pre><span class="line">1</span><br></pre></td><td class="code"><pre><span class="line"><span class="keyword">ALTER</span> <span class="keyword">TABLE</span> &quot;oc_flow_operation&quot; <span class="keyword">ADD</span> entity <span class="type">varchar</span>(<span class="number">256</span>) <span class="keyword">COLLATE</span> utf8mb4_bin <span class="keyword">NOT</span> <span class="keyword">NULL</span> <span class="keyword">DEFAULT</span> <span class="string">&#x27;&#x27;</span>;</span><br></pre></td></tr></table></figure><p><strong>P. S.</strong> GitHub上亦有此issue，看起来受影响的人还不少……见<a href="https://github.com/nextcloud/server/issues/18265">Issue while upgrading to 18 Beta1 (SQL, related to Flow) · Issue #18265 · nextcloud/server</a>.</p>]]></content>
    
    <summary type="html">


          &lt;p&gt;手贱把Nextcloud从17.0.2更新到了18.0.0 (Beta Channel)，结果&lt;code&gt;occ


    </summary>
    
      <category term="日常" scheme="https://0xclover.com/categories/%E6%97%A5%E5%B8%B8/"/>
    
    
      <category term="Nextcloud" scheme="https://0xclover.com/tags/Nextcloud/"/>
    
      <category term="SQL" scheme="https://0xclover.com/tags/SQL/"/>
    
  </entry>
  
  <entry>
    <title>让Linux在一台神舟笔记本上休眠后成功唤醒</title>
    <link href="https://0xclover.com/2019/08/archlinux-hibernation-issue/"/>
    <id>https://0xclover.com/2019/08/archlinux-hibernation-issue/</id>
    <published>2019-08-24T00:00:00.000Z</published>
    <updated>2020-01-19T00:00:00.000Z</updated>
    
    <content type="html"><![CDATA[<p>涉事笔记本系一台神舟Z7M-CT5NA，发行版为Arch Linux，或许也适用于其他症状相同的机器和/或发行版.</p><h2 id="问题">问题</h2><p>详细症状如下：</p><ul><li>能成功休眠；</li><li>重启后加载完休眠映像后迅速黑屏，这时<a href="https://en.wikipedia.org/wiki/Magic_SysRq_key">reisub</a>无效且硬盘灯不亮；</li><li>日志结束在<code>PM: hibernation entry</code>处.</li></ul><h2 id="解决方案">解决方案</h2><p>一番周折后开始考虑内核问题. 在<a href="https://archive.org/download/archlinux_pkg_linux">archlinux_pkg_linux directory listing</a>可以找到<code>linux</code>这个包的所有历史版本. 用二分法可以锁定到是4.16.7版本的某些更新内容导致了唤醒失败，于是找到了这个页面：<a href="https://bugzilla.kernel.org/show_bug.cgi?id=199747">199747 – resume from hibernate results in kernel panic (bisected)</a>.</p><p>（报告人表示重启后Caps Lock狂闪，然而神舟的这台笔记本并没有键盘指示灯……）</p><p>网页上给出的一种解决方案是<strong>把intel_lpss_pci这个模块放在initramfs里面</strong>. 在Arch Linux上编辑<code>/etc/mkinitcpio.conf</code>：</p><figure class="highlight bash"><table><tr><td class="gutter"><pre><span class="line">1</span><br></pre></td><td class="code"><pre><span class="line">MODULES=(... intel_lpss_pci ...)</span><br></pre></td></tr></table></figure><p>然后重新生成initramfs：</p><figure class="highlight console"><table><tr><td class="gutter"><pre><span class="line">1</span><br></pre></td><td class="code"><pre><span class="line"><span class="meta prompt_"># </span><span class="language-bash">mkinitcpio -P</span></span><br></pre></td></tr></table></figure><p>重启后应该就可以正常唤醒了.</p><h2 id="Troubleshooting">Troubleshooting</h2><h3 id="触摸板">触摸板</h3><blockquote><p>执行上述步骤可以正常唤醒，然而唤醒以后触摸板会死掉.</p></blockquote><p>按照网页上的提示，需要在唤醒后<strong>重新加载<code>intel_lpss_pci</code>这个模块</strong>。创建<code>/etc/systemd/system/touchpad-after-resume.service</code>并添加以下内容：</p><figure class="highlight plaintext"><table><tr><td class="gutter"><pre><span class="line">1</span><br><span class="line">2</span><br><span class="line">3</span><br><span class="line">4</span><br><span class="line">5</span><br><span class="line">6</span><br><span class="line">7</span><br><span class="line">8</span><br><span class="line">9</span><br><span class="line">10</span><br></pre></td><td class="code"><pre><span class="line">[Unit]</span><br><span class="line">Description=Reload touchpad</span><br><span class="line">After=sleep.target suspend.target hibernate.target hybrid-sleep.target</span><br><span class="line"></span><br><span class="line">[Service]</span><br><span class="line">Type=oneshot</span><br><span class="line">ExecStart=sh -c &#x27;modprobe -r intel_lpss_pci &amp;&amp; modprobe intel_lpss_pci&#x27;</span><br><span class="line"></span><br><span class="line">[Install]</span><br><span class="line">WantedBy=sleep.target suspend.target hibernate.target hybrid-sleep.target</span><br></pre></td></tr></table></figure><p>然后启用这个unit.</p><figure class="highlight console"><table><tr><td class="gutter"><pre><span class="line">1</span><br></pre></td><td class="code"><pre><span class="line"><span class="meta prompt_"># </span><span class="language-bash">systemctl <span class="built_in">enable</span> touchpad-after-resume</span></span><br></pre></td></tr></table></figure><p>现在触摸板可以在唤醒后正常工作了，但是所有设置（滚动、单击、移动速度……）全都会被重置，<s>只有在系统设置里把触摸板设置重新应用一次</s><strong>解决方案在下面：</strong></p><p><strong>Update 2020-01-19:</strong> 今天发现写在<code>/etc/X11/xorg.conf.d/30-touchpad.conf</code>里的触摸板设置会在唤醒后（实际上应该是X重新检测到触摸板的时候）自动应用，所以只需要把相关设置放在这个文件里即可. 步骤如下：</p><ol><li>执行<code>xinput</code>，找到写有Touchpad之类字眼的那一行，记住id=后的数字；</li><li>用<code>xinput list-props &lt;id&gt;</code>列出触摸板设置，重点关注与Default不一样的值；</li><li>创建<code>/etc/X11/xorg.conf.d/30-touchpad.conf</code>，写入如下内容：</li></ol><figure class="highlight plaintext"><table><tr><td class="gutter"><pre><span class="line">1</span><br><span class="line">2</span><br><span class="line">3</span><br><span class="line">4</span><br><span class="line">5</span><br></pre></td><td class="code"><pre><span class="line">Section &quot;InputClass&quot;</span><br><span class="line">    Identifier &quot;Touchpad&quot;</span><br><span class="line">    Driver &quot;libinput&quot;</span><br><span class="line">    ...</span><br><span class="line">EndSection</span><br></pre></td></tr></table></figure><p>然后参照<code>libinput(4)</code>把触摸板设置翻译成Xorg配置文件的格式，填在…的地方就可以啦.</p>]]></content>
    
    <summary type="html">


          &lt;p&gt;涉事笔记本系一台神舟Z7M-CT5NA，发行版为Arch


    </summary>
    
      <category term="日常" scheme="https://0xclover.com/categories/%E6%97%A5%E5%B8%B8/"/>
    
    
      <category term="Linux" scheme="https://0xclover.com/tags/Linux/"/>
    
      <category term="基建" scheme="https://0xclover.com/tags/%E5%9F%BA%E5%BB%BA/"/>
    
  </entry>
  
</feed>